Simple Italian Meatballs

DSC00875

I am a big lover of everything carbohydrates. As you may remember bread is my poison of choice, but every once in a while I can get down with some pasta. Me and spaghetti go back a long way – it was my regular lunchtime selection in middle school. I always got the spaghetti with meat sauce, for some reason they never had meatballs. And I think I can count on my hands how many times I’ve had spaghetti with meatballs, that is until now.

A few days ago I decided to make some meatballs for myself and M, and I wanted to find a recipe that would let me break in my slow cooker – which I’ve had for over a year and for some reason have not used. So anyway, I was all set to make meatballs in the slow cooker using this recipe that required 6 -8 hrs of cooking time. Unfortunately, I realized at around 4 in the afternoon that I needed to start dinner, obviously that recipe wasn’t going to work. So I looked around for some others that would be quicker, but I definitely still wanted to indulge in some meatballs that had been slowly simmering on top of the stove. So to make a long story short after some recipe browsing and improvising check out what I came up with. Lets get to it.

__________________________________________________________________________

Ingredients

  • 1 lb Ground Beef 85/15
  • 1/2 Cup Breadcrumbs
  • 2 Garlic Cloves – pressed
  • 1 tsp thyme
  • 1 tbsp fresh parsley
  • 1/2 teaspoon ground pepper
  • 1/2 teaspoon salt
  • 1 egg
  • 1/4 cup half and half
  • A jar of your favorite marinara

Directions

  1. Mix beef, breadcrumbs, garlic, thyme, parsley, egg, pepper, salt, and half and half together in a large bowl. Mix using your hands for the best results
  2. Roll meatballs to about the size of a golf ball. 1 lb of beef made about 16 meatballs.
  3. Put the meatballs into a pot of your favorite marinara sauce
  4. Simmer on low to medium heat for about 1.5 hrs.

Old Fashioned Blueberry Muffins

IMG_2755

A couple christmases ago my man bought me Baking Illustrated. At the time I had just decided to get more serious about my baking. Up until that point I was more of a casual occasional baker. When I opened it I was thrilled because I needed a cookbook, but I really had no idea until recently how great of a cookbook it really is. I should have known immediately what gold it was, because my man is the king of reviews :) But I digress. I could go all day about why I love Baking Illustrated, but I’ll spare you and simply recommend it to anyone who is at all interested in baking and especially those interested in the trial and error behind recipe development.

So now for the good part, these yummy Blueberry Muffins. I think I professed in an earlier post that I am a bit of a blueberry muffin connoisseur because I’ve spent a lot of time eating them. What I love about this particular recipe, from Baking Illustrated,  is that its kind of a cross between a biscuit and a muffin, so it basically chews like a soft scone. I love all takes on anything bread and would love any muffin, but I like a recipe that goes against the grain a bit. So lets get into it.

Ingredients

  • 2 cups unbleached all -purpose flour
  • 1 tbs baking powder
  • 1/2 tsp salt
  • 1 large egg
  • 1 cup sugar
  • 4 tablespoons unsalted butter, melted and cooled slightly
  • 1 1/4 cups sour cream
  • 1 1/2 cups frozen or fresh blueberries
  • 1 large lemon
  • Extra sugar for dipping

Directions

  1. Place your oven rack in the middle position and preheat the oven to 350 degrees. Go ahead and grease a standard sized 12 cup muffin tin
  2. Combine flour, baking powder, and salt in a medium bowl using a whisk.
  3. In a second medium sized bowl whisk 1 egg until its completely combined – this will take about 20 seconds. Now add sugar in with the egg and whisk vigorously until its thick and homogenous – about 30 seconds. In two additions add melted butter , make sure to mix after each addition. Finally add sour cream to this mixture in 2 additions – you just want to whisk enough to combine.
  4. Now add blueberries to flour mixture – toss lightly to mix in blueberries. Using a rubber spatula gently fold in the sour cream mixture from step 3 until the batter just mixes together – about 30 seconds. Its really important here to not over mix. In fact if you have a few spots of flour in your mixture its completely fine.
  5. Divide your batter up in the 12 muffin cups. You can spray a spoon with non stick cooking spray to keep the batter from sticking to your spoon. You will bake your muffins for 25 – 30 minutes until they are golden brown and they pass the toothpick test. About half way through the full cook time rotate your pan to help insure even baking.
  6. Invert muffin tin onto a wire wrack and allow muffins to cool for about 5 minutes.
  7. While muffins are cooling juice one lemon, remove pulp and seeds, and heat on low heat in a sauce pan. Add in 1/4 cup of sugar and let it simmer until a syrup forms.
  8. Pour about 1/2 cup sugar into a small bowl. Using a pastry brush coat the tops of the muffins with lemon syrup and then dip muffins into sugar. Enjoy!!

IMG_2730

Food Blogging with an iPhone for beginners

IMG_2543

I’m definitely a newbie when it comes to the world of food blogging. I actually never intended my blog to go in that direction, but I love to bake and I had a longtime love for photography that somehow resurfaced – so here I am. When I started taking pictures of food, I quickly found out how little I knew about the basics of photography, but after browsing tons of sites and reading a book I’ve gotten better in a short period of time. One thing I wish i could find tons of sites about is how to do food blogging with an iPhone. Turns out that most people use fancy DSLR cameras, when I save enough money hopefully one day I will too. Until that day comes I’m trying to get the basics down and maximize the potential of my iPhone 5s, which by the way takes pretty decent pictures.  I digress, let me share a little bit with you –  some that I learned from trial and error, some from tons of reading.

#1 Keep it simple – The iPhone has a great camera, but its important to remember that it’s pretty limited – thats why its so fun and easy to use. You have little control over the depth of field and as you get better and/or learn more about photography that will annoy you more and more. So in order to maximize the potential of the iPhone keep  props to a minimum – you won’t be able to blur your backgrounds much to keep the attention on your subject. Props are great, but you want the focus on your subject. This is the point where I say ,honestly, I really like more simplistic pictures so I am biased.

#2 Focus, focus, focus – One thing I love about my iPhone is the my ability to interact with the screen to choose my point of focus. This makes its much easier to select exactly what you want to fucus on. You’re only working with about 8 megapixels, but this allows you to really make them count. So, do focus – often and a lot. Play with different points of focus, and remember that some points of focus will result in different amounts of lighting. Select the point of focus that allows for the best balance of light.

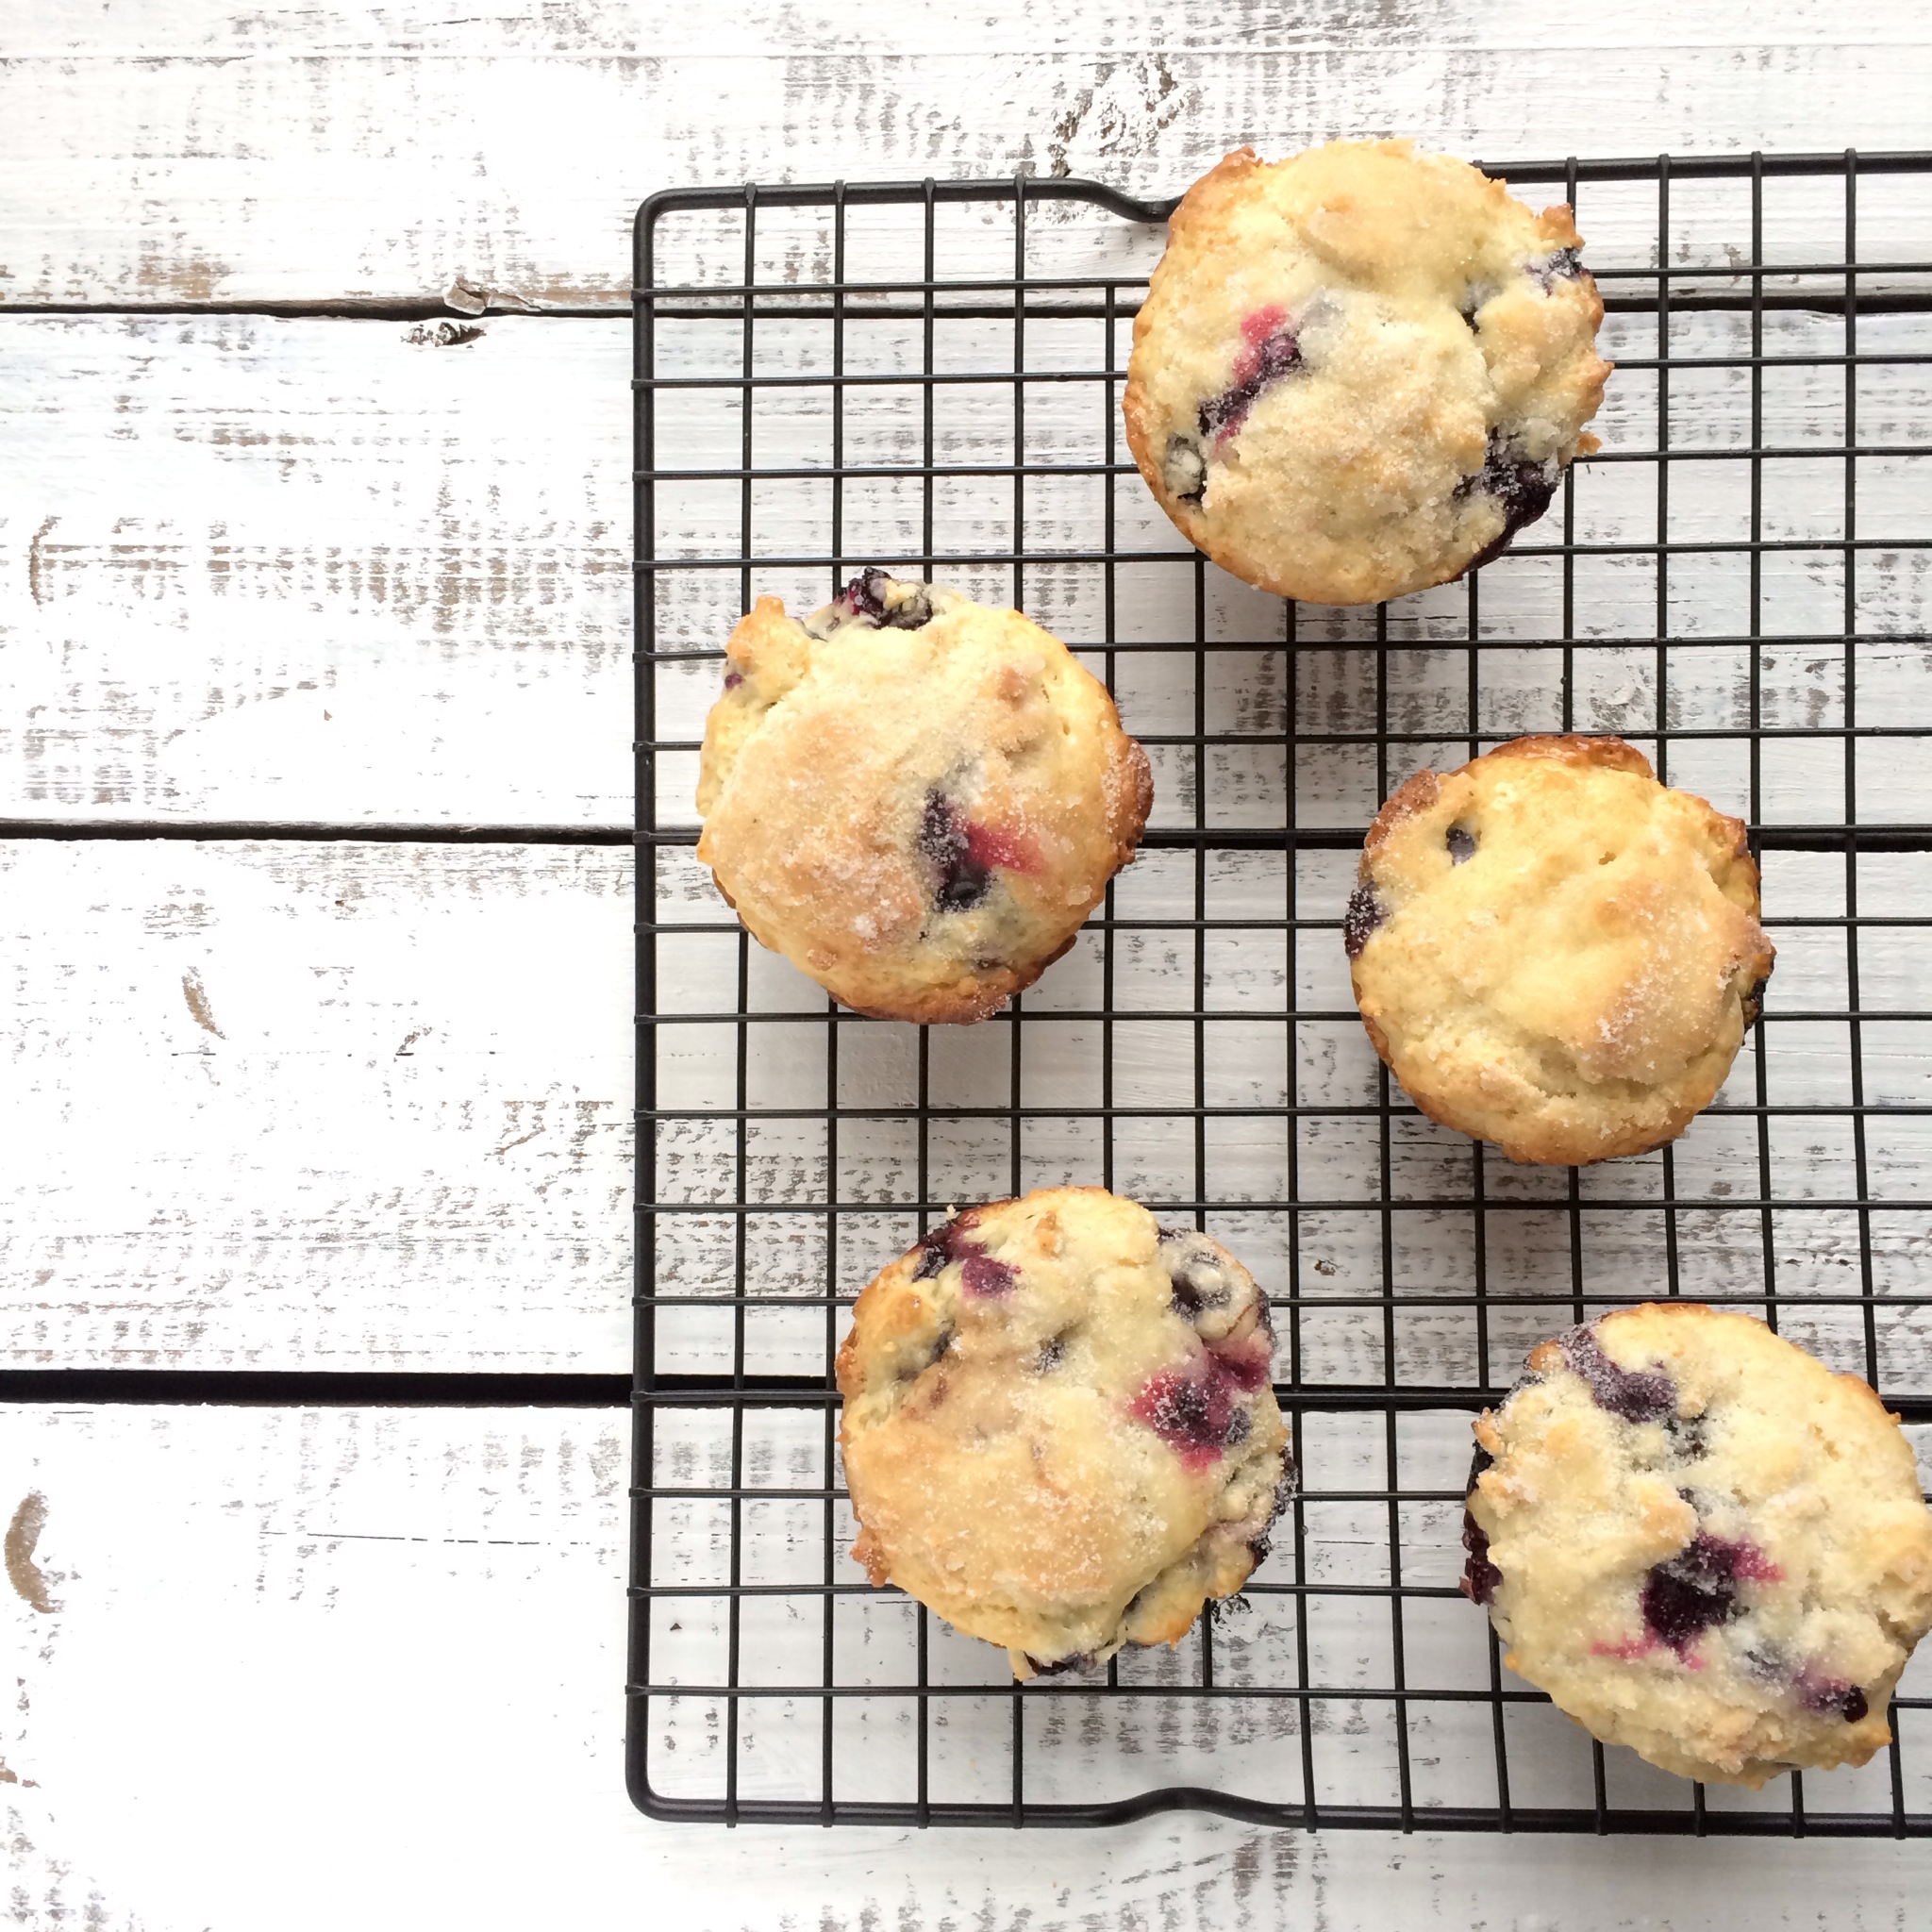
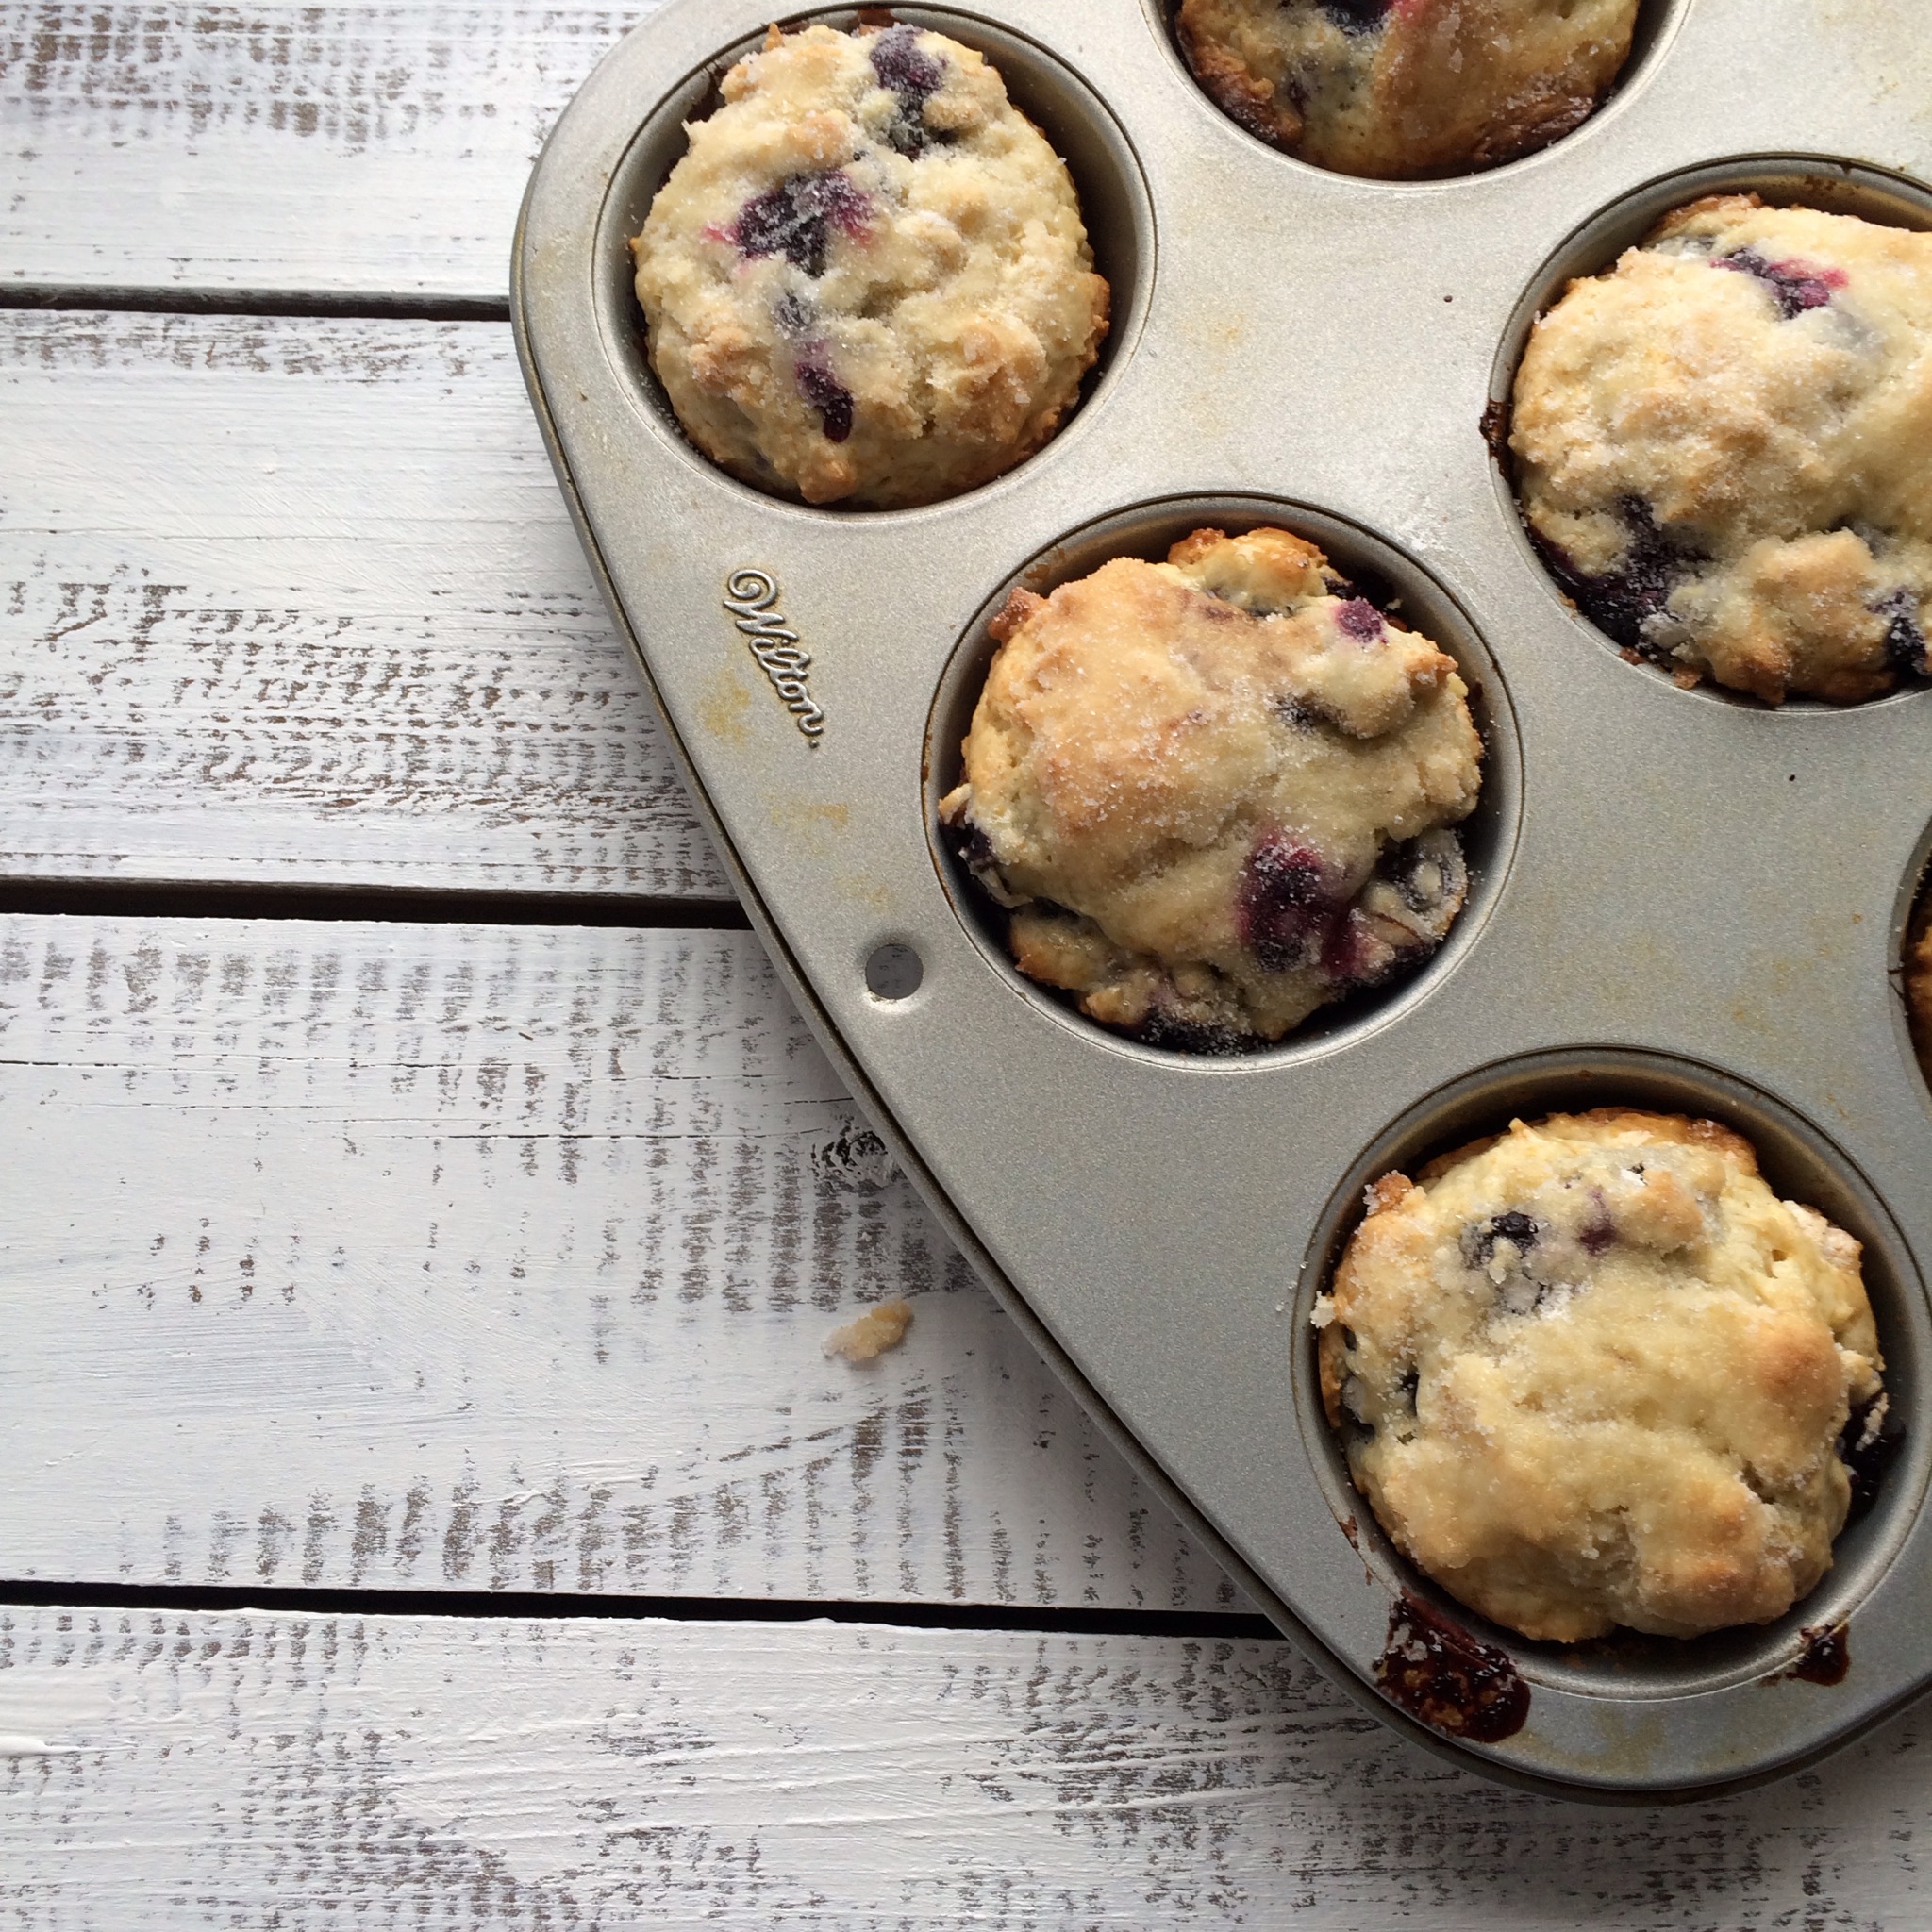
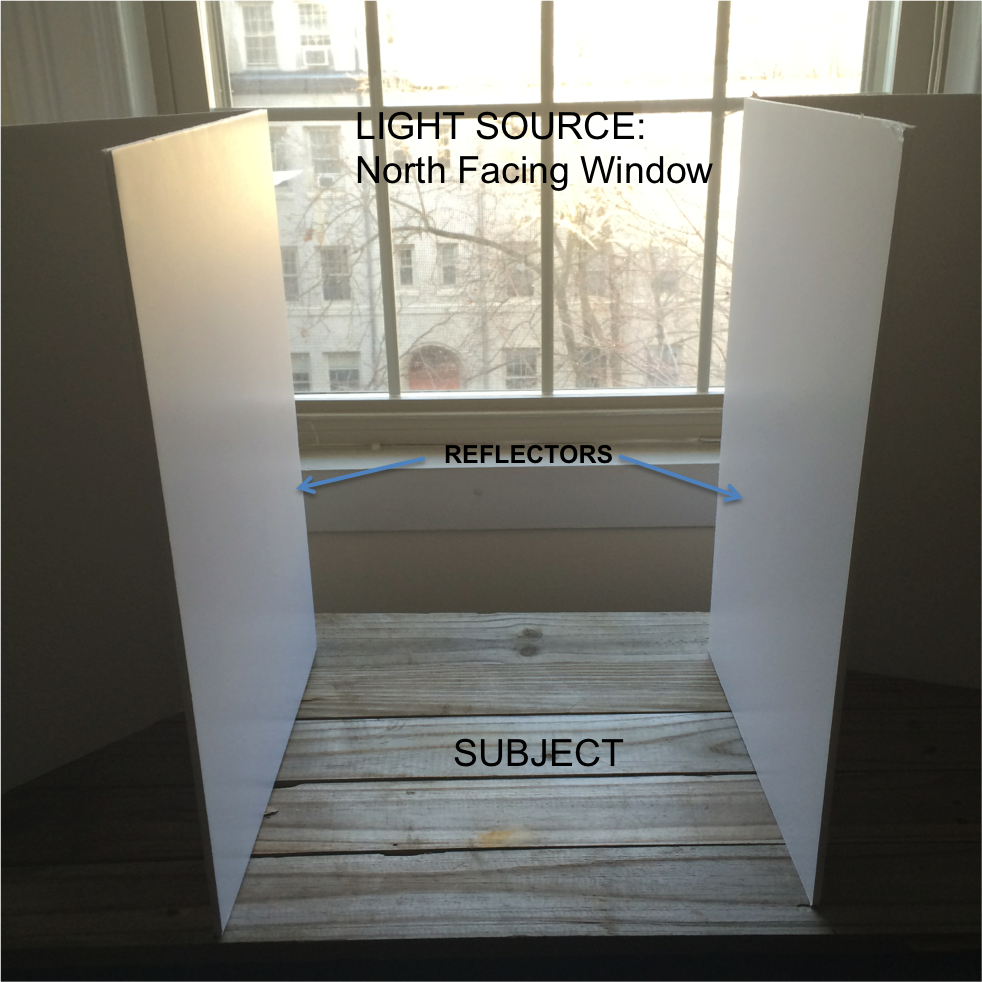
#3. Lighting Matters – if you have done any reading about photography you have problem learned that lighting is THE most important part. All those books ain’t lying. Bad lighting =’s a bad photograph. Earlier I experimented a lot with DIY Ego lighting – and got pretty good results. But my recommendation is to go with natural light – it really adds life to your photos and makes food look as delicious as it tastes. Here are some  quick tips on how to harness the beauty of natural light. First I like north facing windows – the light is indirect and relatively consistent for many of the daylight hours of the day. Second – diffuse diffuse diffuse, this will give your photos a softer more even lighting. And last – use reflectors. These don’t have to be expensive, I just use white foam board. These can help you illuminate parts of your subject that may be darker. Here is the basic set up I used to take the photos in this post. 

Untitled

#4. Don’t use the flash – this really could have been part of the previous tip but I didn’t want it to get lost. It’s imperative to never use the flash when photographing food. It makes your food looked washed out, and who wants to look at or click on washed out food – ‘nough said.

#5. Try try again. Honestly this tip probably applies to life in general, but as your mom always said “ if at first you don’t succeed try try again” It’s easy to take a million pictures with the iPhone – use that to your advantage. You would be surprised how what you capture can change even when you think you didn’t change anything. If you take a lot of pictures, you can find the best one – the one with the best lighting, the best focus, the best perspective.

I am by no means an expert, I have a lot to learn and I’m looking forward to soaking up every bit of knowledge possible. But I wanted to write this post for two reasons. One, I want other people who are using their iPhones to food blog not to feel alone or inferior for some reason. And two, because I wanted to tell you what I’ve learned in a quick and hopefully helpful way. Good Luck!!

 IMG_2511

Modern love

Since leaving college I have lived in 3 different apartments – all had 3 very distinct looks. My love for design and the process that goes along with it means I buy new things every time I move – yes this is incredibly expensive lol.  But it’s  allowed me to evolve my style and see the growth and evolution of my personal taste and ability to put together a space. I secretly – or not so secretly according to my man – love moving because it means a new opportunity to do something I truly love to do.

My current place is my favorite for many reasons, but primarily because I think it represents me and my current design potential. I have become less and less dependent on Ikea over the years and that’s allowed my imagination to expand. As my imagination has been wandering I have developed a genuine love and appreciation for mid-century design and architecture – I’d like to think it has nothing to do with my love of Madmen. Needless to say I’m excited for my next move. Luckily I have an amazing man in my life that notices my obsessions and encourages me to not just be a casual lover, but a knowledgeable one. Check out my recent birthday haul. The two on top are from my big brother :) Looking forward to exploring/using each of them.

birthday books

Starting out

A few days ago I was visiting my long distance boyfriend. We have been together for almost 10 years, and have spent about half of that living in different states. In about a year we will finally be living under the same roof, and I’ve been thinking about ways to kind of commemorate the last leg of this phase of our relationship. So, a couple weeks ago I decided to make a quilt. I told him and he suggested I set up a blog and write about it. Immediately it sounded like a great idea, so here I am. In the process of coming up with a page name I realized that this could be an opportunity , not only to share an incredibly important journey in my life, but also to finally develop a real outlet for one of my biggest loves – design.  So, here’s to trying something new!