I’ve been baking since I was a little girl. Every Christmas baking was a big deal in my house. Pound cake, sugar cookies, bread pudding, apple pie – this probably explains why I always had a mouth full of cavities. Anyways, by far my favorite holiday treat was always sweet potato pie. For anyone who has ever made it it is really simple, and that meant it was something I had the chance to help with every Christmas. Over the years ,as I got older, it pretty much became my signature holiday desert. I have had about 20 years to perfect it and I would say it’s pretty damn good. Anyway, somewhere between helping my mom as a child and owning that sweet potato pie recipe I realized I really like to bake, so why not write about that too.
About a year ago I made the proclamation that I loved to bake, and I was going to be great at it. So my man bought me a ton of books – all the ones any aspiring baker would want. My only dilemma is that when you bake something someone has to eat it, and I cannot be that exclusive someone. So, needless to say, I still do most of my baking around the holidays when I and no one else couldn’t care less about calorie counting. I figure now that I have this blog that’s going to change – that means I have a lot of friends who are going to be getting a lot of baked goods. Ok, so now you know a little bit about my baking history – let’s talk apple pie!!
Now I have been around a fair amount of apple pies – like most of us. My brother at some point ,years back, started making one every christmas and my boyfriend a couple years back started making them. I was looking for the perfect treat to bring to a meeting and the weather seemed just about right for some yummy apple pie. The weekend before I was planning to bake it, I was in Pittsburgh visiting my man and I mentioned I was thinking about making a pie. This is where I get to admit that I don’t take advice very well. For some reason I don’t like people telling me what to do, even if it’s delivered as friendly advice. Long story short we bickered about the taste and quality of frozen vs refrigerated pre made pie crust. He’s going to read this so I have to admit that he is right on the pre-made crust debate and I’m not just saying that because he is reading this. In the end none of this mattered anyways because I chose to make my crust from scratch.
Remember I mentioned I have a lot of baking books, well I ended up making an apple pie recipe which was a combination between America’s Test Kitchen’s Blue-Ribbon Apple Pie and Baking Illustrated’s Classic Apple Pie.
First The Crust…
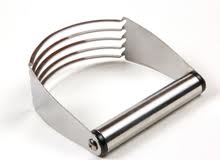
I decided to take the plunge to make my own crust. I have to admit it’s not my first time – I did it once last year for my yummy sweet potato pie. But this is certainly my first double crust and definitely my first attempt at lattice work. I chose to follow the pie crust recipe in America’s Test Kitchen because it included modified instructions for folks who wanted to hand mix. I didn’t necessarily want to do it by hand, but I don’t have a food processor. I also didn’t have a pastry blender, but that was the much cheaper option – and according to some it makes a better, flakier crust. So I went to a kitchen store and picked up one of these.
Here’s the recipe:
1/3 cup ice water – do have some extra to modify the texture of your dough if you need to
3 tablespoons sour cream
2 1/2 cups all-purpose flour
1 tablespoon sugar
1 teaspoon salt
16 tablespoons unsalted butter – cut these into 1/4 inch pieces and then freeze them for 10 to 15 minutes before you start
Basically this is a simple enough process. Mix up all your dry ingredients (flour, sugar, salt) and then grab your butter and work it into the dough with the pastry blender. But there are a few things to keep in mind here. First the butter must be firmly frozen – this will insure that your crust comes out flaky. Second, do not over mix your butter into your dry ingredients. For one it means your butter is exposed longer and is more likely to melt. But most importantly your crust will come out firm and crappy. All the books say mix it until you have a course gravel type mixture. If your using a pastry cutter, what your going for is more like a bowl full of chunky flakes – if that makes sense. Once that happens your good to go. In order to end up with that texture you will need to be adding your water and sour cream simulatenously as you mix the dough (helps if you combine them together). If your dough is sticking together when you pick it up between two fingers your done – divide it roughly in half wrap it in plastic wrap and put it in the freezer for at least an hour. In the mean time work on the rest of the pie.
Here’s the recipe:
2 tablespoons unbleached all-purpose flour – have some more to put on your dough working surface
2 large Gala apples
3 large Granny Smith apples
1 tablespoon lemon juice and 1 teaspoon of lemon zest
3/4 cup sugar and 1 tablespoon for sprinkling later
1/4 teaspoon nutmeg
1/4 teaspoon ground cinnamon
1/4 teaspoon ground allspice
1/4 teaspoon salt
1 egg white, beaten lightly
A word about apples: Bakers Illustrated recommends you use more apples 7 total, and they recommend McIntosh instead of Gala. I personally love bread so that means I don’t like my apple pie piled high with apples. So I reduced the amount of apples, and I use Gala apples because I just like them. The mix of a sweet apple like Gala with a tart one like Granny Smith makes for a very balanced pie.
Place a cookie sheet (with sides) on one of the bottom racks of your oven – this will keep your oven from becoming a sticky applely mess. Preheat your oven to 500 degrees. Then peel, core, and slice up your apples ( about 1/4 inch thick slices). Toss the apples in lemon juice and lemon zest and set them aside. In another bowl mix together flour, spices, salt and sugar – combine this mixture with your apples.
Now for the dough…
At this point your dough has probably been chilling in the freezer for about an hour. Take it out and let it warm up for about 5 minutes. Then using a rolling pin, roll out the first half of your dough until its about 1/4 inch thick. Put the other half of your dough in the fridge until your ready to use it. Check out this video for tips on rolling out and transferring dough http://www.youtube.com/watch?v=vEiT4aBRFM4 I found it pretty helpful.
Once you have transferred your dough to your pie pan pour your apple mixture into the pie pan and grab the other half of your dough from the fridge – it’s lattice time! Because this is hard to explain I’ll refer you to another helpful video http://www.youtube.com/watch?v=Jz3UQF0jsz4
Okay now that your lattice is done and beautiful, whisk up one egg white and brush it onto your lattice. Sprinkle about a tablespoon or so of sugar on top. Now for the best part – put the pie in the oven and enjoy the wonderful smell of homemade apple pie for the next hour. As soon as you place the pie in the oven turn down the temp to 425 – let the pie cook for about 25 min. Then reduce the temp again to 375 and cook for another 30 – 35 min. Let it cool to room temp and enjoy :)
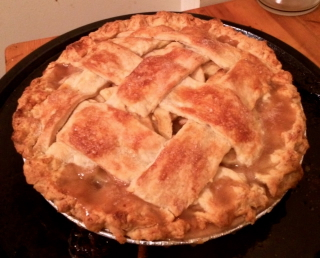
Here’s my finished product. By the way it was delicious!!!